Pages

Friday, November 11, 2011

Photographing in the Rain

by Barbara Brundege

You may have heard before that photographing in inclement weather can bring unusual photographs, but you may not be aware of what exactly the benefits are to photographing in the rain.

Photographing in a light rain is in fact one of my favorite times to photograph, and I have spent many hours observing nature with my camera in the rain. First of all, when there is cloud cover, there is lower contrast. In the days of film photography this was very beneficial as the contrast range of film matched more directly with the contrast range of light on a rainy day.

Nowadays, in the digital era, it is still a benefit because with the ability of digital cards to record more information you can see even more details and gradations from one color to another. I have always loved a lot of detail in my photographs, and with the rain the reduced contrasts allow one to look deeply into the shadows and see all the lovely color variations.

You may also have noticed that colors seem to "pop out" and be more vibrant and textures can almost be felt when you view photos created on a rainy day. This is partially due to the lower contrast but it also has to do with the glossy wet conditions of the water on the subject. If you have done any type of printing, you are probably aware that a glossy print will show off more detail than the same picture printed on a matte paper.

Another benefit is that there is a soft quality due to the lower contrast of light. So, energetically, everything seems to be more soft, alive, and vibrant. Many times, the rain provides areas where our subject is reflected creating even more colors in the scene so be sure to walk around your subject and move your perspective up and down. You may discover a little extra surprise from reflected colors in the wet areas.

One caution of photographing on a rainy day is to be aware that the overcast light is quite blue and you may see a lot more of the blue wavelength creating a color cast on all the colors in your scene. If you observe this, you may want to put your white balance on light shade which is slightly yellow, and this will counteract the blue overcast light from the sky.

Also, be sure your camera is protected from the elements. There are many covers out there to buy, but a free shower cap from your next hotel visit works great!

I hope you can get out in a light rain sometime soon and enjoy the colors!

Saturday, October 29, 2011

Monterey Bay Aquarium

 by Allen Kuhlow

Seahorse -
© Allen R. Kuhlow

Recently, we visited one of our favorite wildlife sites on the central California coast, the Monterey Bay Aquarium. Wildlife? At an aquarium? Yes, the Monterey Bay Aquarium really is a great location to study and photograph wildlife.
The aquarium features several natural environments where you can hone your action photography skills, including a 350,000 gallon Outer Bay Habitat and a Giant Kelp Forest. We were especially interested in visiting the seahorse exhibit.
Now, you might think that photographing wildlife in an enclosed exhibit wouldn’t offer much of a challenge, but I can confirm that it’s not as easy as you think to create memorable images in an aquarium. Your challenges include waiting for that expressive pose from your chosen animal, finding a suitable background that gives a sense of place for the wildlife, and keeping your fellow photographers out of the picture. As you know, everyone has a cell phone with a camera so you’ll have plenty of company! We visited the aquarium during the week when fewer visitors were at the aquarium.


Seahorse - © Allen R. Kuhlow

The Secret Lives of Seahorses exhibit is magical. (The seahorses can be seen daily through August 2012.) Several of these animals are truly unreal. Their camouflage makes them almost invisible in nature, so the aquarium’s display provides a rare glimpse and a reasonable chance to photograph them…But it’s not easy. As the seahorses drift past and the background plants bend slowly and the other visitors create their favorite photos, you realize that you are part of a slow-motion dance. Oh, and did you set your camera to optimize the results you expect before you started creating those memorable images? It's fascinating to watch these delicate animals, and photography might be temporarily forgotten!
Another interesting note: The aquarium has made a temporary home for a juvenile Great White Shark, so now is the time to view this magnificent animal from a safe distance.
The light available for photography is limited; for some of the creatures, more light would be harmful to their health. Use a lens that gathers more light, your lens with the largest aperture. Check for signs that tell you whether you can use flash or not, and remember that flash pointed directly at the aquarium glass will bounce back into your lens, which means you’ll be deleting that image.
For some photographers the Monterey Bay Aquarium will be a welcome change of pace. Although the wildlife in confined within tanks, the opportunity to photograph sea creatures in natural-appearing habitats while improving your action photography skills is a welcome challenge…and it’s all done in an environment that is more comfortable than many places where we photograph wildlife!

Friday, October 21, 2011

Lightroom: Create an Image Renaming Preset

by Allen Kuhlow

I prefer to rename my digital files as I bring them into Adobe Lightroom. I eliminate the generic file name that my camera provides and create a name that has more meaning for me. Renaming the files is easy and efficient during the import process, so it speeds my workflow.
The process of importing images into Lightroom requires a few minutes to set up. However, subsequent importing sessions are fast and efficient once the importing process has been established.
I can rename these images automatically because I have created a preset that performs this task and several others as I import them. Here’s how I do that.

Begin with Lightroom open to the Library module. Near the bottom of the Library’s left panel, click the Import button.


The Import screen contains three columns. Look in the right column for the section titled File Renaming; you may need to click the twistie/triangle to open this section.
Select Edit from the Template dropdown menu.
I start my new file-naming preset with my name. Then I press the underscore key ( _ ).
It’s a good idea to use an underscore to tie the parts of your file name together.
Notice that Lightroom provides an example of how your files will be named if you use the current file-naming preset.
The next part of my file name is the date. You will find several options when you click the Additional dropdown menu.
Note: If you are a portrait or wedding photographer, you might include your client’s name instead of the date.
When you have made your choice, click the Insert button to add the date to your preset. Press the underscore key ( _ ) again.
Again, Lightroom provides an example for your approval.
The last part of my file-naming preset is called the Filename number suffix.
This is the last portion of the file name that my camera gives an image when it is saved on my camera’s memory card.
This option is located in the Image Name dropdown menu.
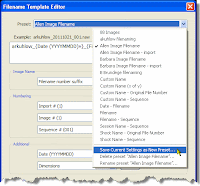
The last step in this process of creating a new file-naming preset is to save your work.
You might be tempted to click the Done button at the bottom of the window, but that would be a mistake because it will cancel the work you have just completed!
The correct way to save your new file-naming preset is to click the Preset dropdown menu at the top of the window, and click the appropriate option.
If you are creating a new preset, choose Save Current Settings as New Preset.
If you are modifying a preset, you could choose Rename preset “xxxxxx”, where the name of the template you are modifying appears inside the quotation marks.
As I mentioned at the beginning, this is part of my process for importing images into Lightroom. There are other options in the Import screen that I use while I’m importing images, and they make image management efficient and fast. These importing tasks include deciding which information to apply to the images and deciding where the images will be stored. You can save all of these options to make your workflow even faster and more efficient.
I’ve limited this posting to the file-renaming part of my Lightroom import process. Other parts of the process will have to wait for another time.

Sunday, October 16, 2011

Bracket the Composition, Not the Exposure

by Allen Kuhlow

I’ve never been a big fan of bracketing as a photographic technique. It was costly when film was the medium for recording an image; it seems even less necessary with the instant feedback that digital photography provides.
However, I love the freedom that digital photography provides. Knowing that I don’t have to pay for film and its processing has inspired me to create more variety in my images. So now I am passionate about bracketing – bracketing to exercise my creativity!
I’ve included two pairs of images to show you what I mean. This first pair was created in Florence, Italy. The top of Brunelleschi’s famous dome is featured in a closeup in this pair of images. The basic difference between these two images is a slight tilt in one of them. The first image, in which the dome and its cupola are more vertical, seems solid and grounded. The second image, the tilted one, seems more fluid, and it seems to pull my eye upward into the sky.
Duomo, Florence, Italy -  © Allen R. Kuhlow


The second pair of images came from the front window of a Florentine gelateria, not too far from Brunelleschi’s famous dome. Here, the difference is the result of using both of the cameras I was traveling with: my vertical camera and my horizontal camera. I usually see more than one image before I bring my camera to my eye, so I held my camera horizontal and created the first image. I found myself thinking about how many gelato cones this shop must sell every day! Then I was drawn to the height of the stacks, and I thought about how many scoops of gelato each person stacked on these cones. This became the inspiration for the vertical image.
Gelato Cones, Florence, Italy - © Allen R. Kuhlow

I seldom keep multiple versions of each image I create, but the practice of creating them gets my creativity moving and sets me free to look around and explore with the camera. Digital photography has expanded my freedom to try new ideas, to concentrate on the image and not on the camera.